I’m Using a MEGA 2560 Arduino.
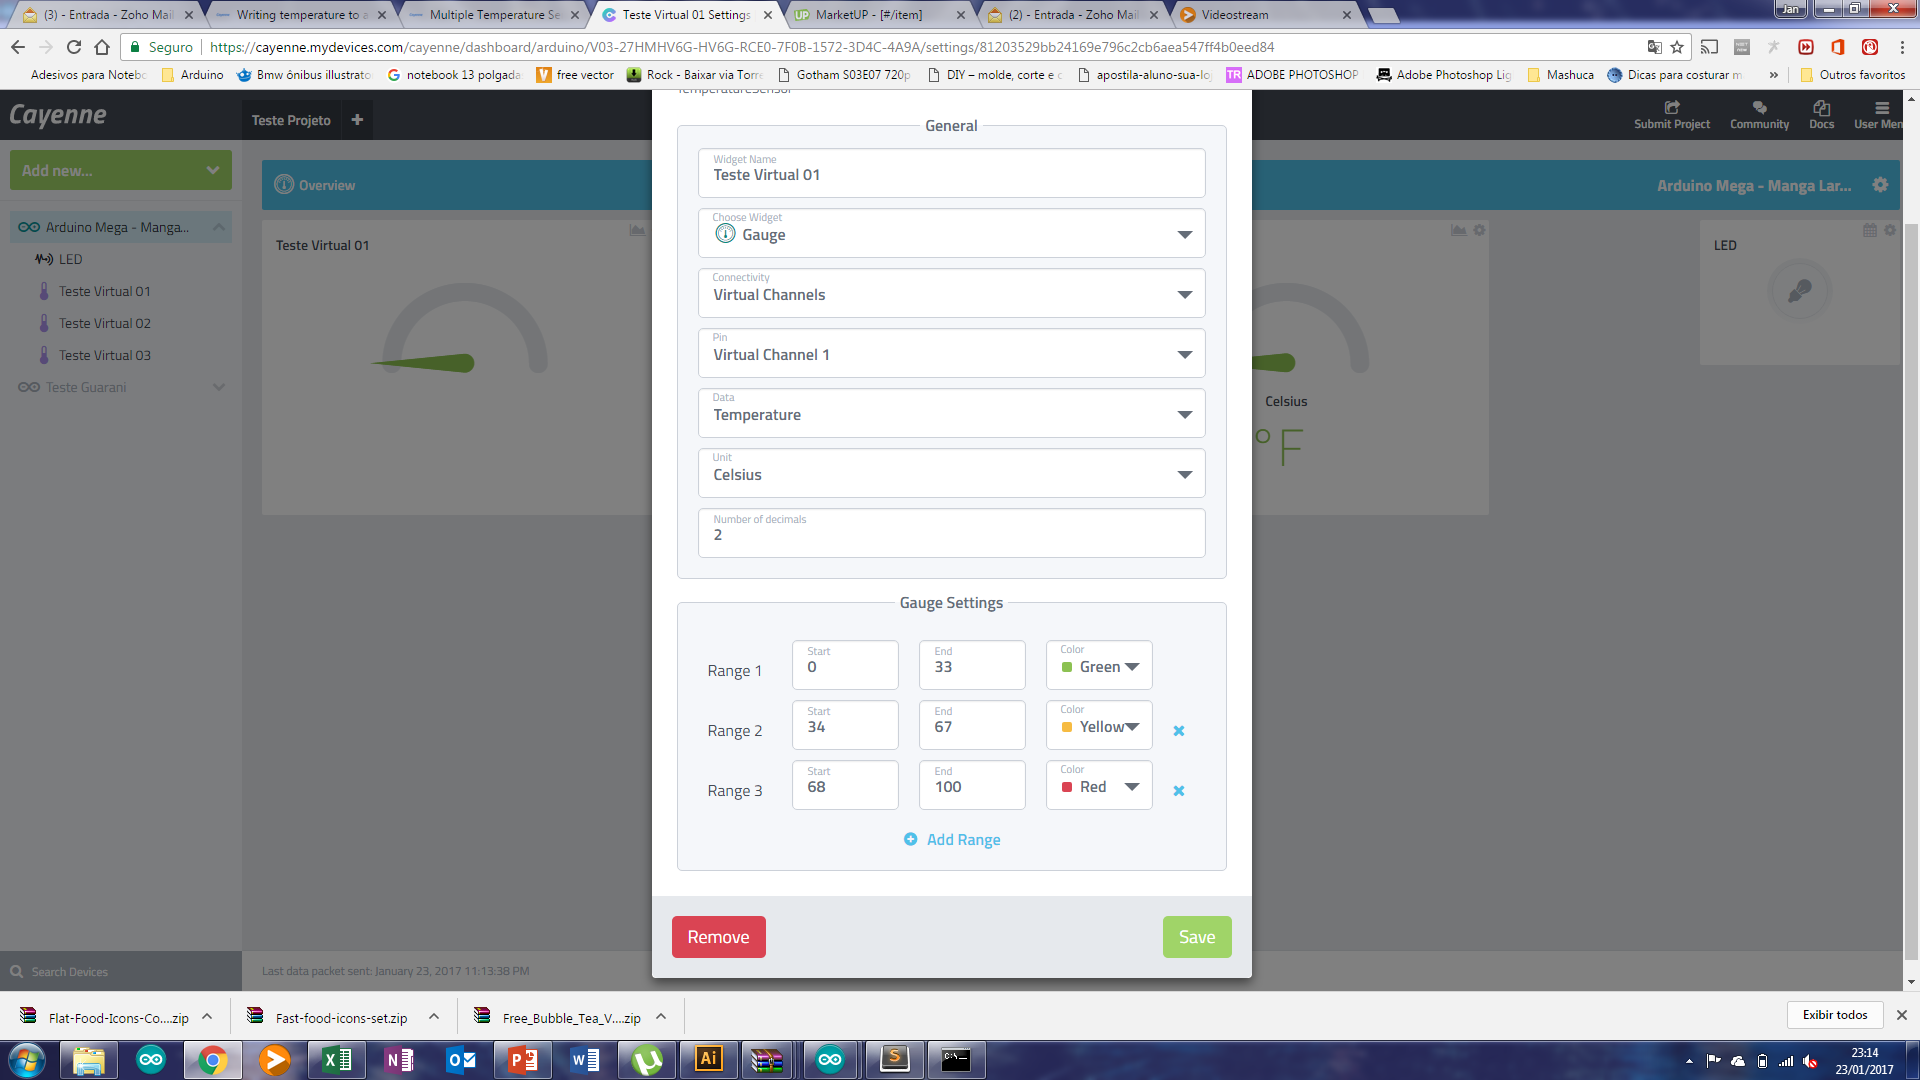
and Three Temperature Sensors in one pin 3. I have used virtual pins, but it is not recognize in Cayenne Overview dashboard.
Someone could me help
I’m Using a MEGA 2560 Arduino.
and Three Temperature Sensors in one pin 3. I have used virtual pins, but it is not recognize in Cayenne Overview dashboard.
Someone could me help
//#define CAYENNE_PRINT Serial // Kad sutaupyti atminties galima uzkomentuoti.
#include "OneWire.h"
#include "DallasTemperature.h"
#include "CayenneSerial.h"
// Aprasyti virtualus PIN'ai rysiui su Cayenne
//-------------------------------------------------------------------------------------------------------------------------//
#define AkumTempV1 V0
#define AkumTempV2 V1
#define AkumTempV3 V2
//-------------------------------------------------------------------------------------------------------------------------//
// Aprasyti temperaturu davikliu PIN'ai
//-------------------------------------------------------------------------------------------------------------------------//
#define TempDavikliai 3 //DS18B20 davikliu PIN
float akum_temp1;
float akum_temp2;
float akum_temp3;
//-------------------------------------------------------------------------------------------------------------------------//
// DS18B20 davikliams ant OneWire
OneWire oneWire(TempDavikliai);
DallasTemperature sensors(&oneWire);
//DS18B20 davikliu adresu aprasymas
//-------------------------------------------------------------------------------------------------------------------------//
DeviceAddress AkumT1 = { 0x28, 0xEE, 0x02, 0x88, 0x16, 0x16, 0x01, 0xE1 };
DeviceAddress AkumT2 = { 0x28, 0xEE, 0x1E, 0x3B, 0x15, 0x16, 0x01, 0x41 };
DeviceAddress AkumT3 = { 0x28, 0xEE, 0xA1, 0x45, 0x17, 0x16, 0x02, 0x71 };
//-------------------------------------------------------------------------------------------------------------------------//
// Cayenne authentication token. This should be obtained from the Cayenne Dashboard.
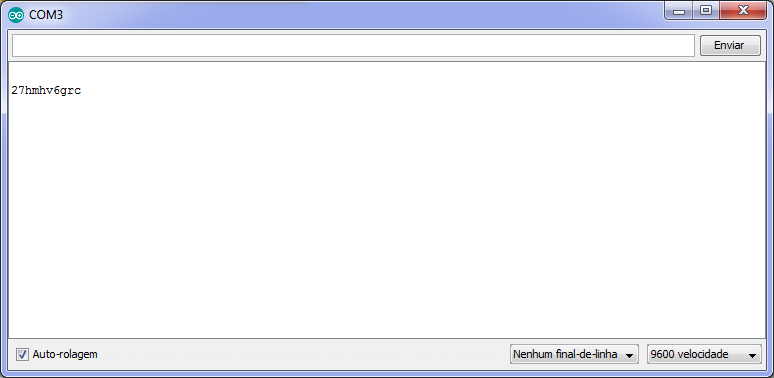
char token[] = "27hmhv6grc";
// Setup pradzia
//---------------------------------------------------------------------------------------------------------------------------------------------------------------------//
void setup()
{
Serial.begin(9600);
Cayenne.begin(token);
sensors.begin(); // Uzkuriam DS18B20 daviklius
sensors.setResolution(AkumT1, 11); //Rezoliucija: 9 - 0.5°C; Rezoliucija: 10 - 0.25°C; Rezoliucija: 11 - 0.125°C;
sensors.setResolution(AkumT2, 11);
sensors.setResolution(AkumT3, 11);
}
// Loop pradzia
//---------------------------------------------------------------------------------------------------------------------------------------------------------------------//
void loop()
{
Cayenne.run();
sensors.requestTemperatures();
akum_temp1 = (sensors.getTempC(AkumT1));
akum_temp2 = (sensors.getTempC(AkumT2));
akum_temp3 = (sensors.getTempC(AkumT3));
}
// This function is called when the Cayenne widget requests data for the Virtual Pin.
CAYENNE_OUT(AkumTempV1)
{
// Send the command to get temperatures.
sensors.requestTemperatures();
// This command writes the temperature in Celsius to the Virtual Pin.
//Cayenne.celsiusWrite(AkumTempV1, sensors.getTempC(AkumT1));
Cayenne.celsiusWrite(AkumTempV1, akum_temp1);
//Cayenne.virtualWrite(AkumTempV1, sensors.getTempC(AkumT1), TEMPERATURE, CELSIUS);
}
CAYENNE_OUT(AkumTempV2)
{
// Send the command to get temperatures.
sensors.requestTemperatures();
// This command writes the temperature in Celsius to the Virtual Pin.
//Cayenne.celsiusWrite(AkumTempV2, sensors.getTempC(AkumT2));
Cayenne.celsiusWrite(AkumTempV1, akum_temp2);
}
CAYENNE_OUT(AkumTempV3)
{
// Send the command to get temperatures.
sensors.requestTemperatures();
// This command writes the temperature in Celsius to the Virtual Pin.
//Cayenne.celsiusWrite(AkumTempV3, sensors.getTempC(AkumT3));
Cayenne.celsiusWrite(AkumTempV1, akum_temp3);
}
You must use a # before the include and define.
#include OneWire.h
#include DallasTemperature.h
#include CayenneSerial.h

// Aprasyti virtualus PIN'ai rysiui su Cayenne
//-------------------------------------------------------------------------------------------------------------------------//
#define AkumTempV1 V0
#define AkumTempV2 V1
#define AkumTempV3 V2
//-------------------------------------------------------------------------------------------------------------------------//
I’m using this sintaxe (#), but it’s not working yet
It looks like in each of the Cayenne.celsiusWrite commands you’re referring to Virtual Pin V0 (AkumTempV1) each time. I’d expect that you’d want this to be different for each CAYENNE_OUT block
I tried this sintaxe and it did not work to.
“I’m using this code for another exemple in this Comunity.”
CAYENNE_OUT(AkumTempV1)
{
  // Send the command to get temperatures.
  sensors.requestTemperatures();
  // This command writes the temperature in Celsius to the Virtual Pin.
  Cayenne.celsiusWrite(AkumTempV1, sensors.getTempC(AkumT1));
}

CAYENNE_OUT(AkumTempV2)
{
  // Send the command to get temperatures.
  sensors.requestTemperatures();
  // This command writes the temperature in Celsius to the Virtual Pin.
  Cayenne.celsiusWrite(AkumTempV2, sensors.getTempC(AkumT2));
}

CAYENNE_OUT(AkumTempV3)
{
  // Send the command to get temperatures.
  sensors.requestTemperatures();
  // This command writes the temperature in Celsius to the Virtual Pin.
  Cayenne.celsiusWrite(AkumTempV3, sensors.getTempC(AkumT3));
}
As I provided in the other thread, you do not need to call sensors.requestTemperatures() in the virtual functions. Your main loop is doing it, and the subsequent calls are filling the global variables akum_tempX with the readings.
So you only need to do this:
CAYENNE_OUT(AkumTempV1)
{
    // This command writes the temperature in Celsius to the Virtual out.
    Cayenne.celsiusWrite(AkumTempV1, akum_temp1);
    Serial.print("Temp1 Out: ");
    Serial.println(akum_temp1);
}

CAYENNE_OUT(AkumTempV2)
{
    // This command writes the temperature in Celsius to the Virtual out.
    Cayenne.celsiusWrite(AkumTempV2, akum_temp2);
    Serial.print("Temp2 Out: ");
    Serial.println(akum_temp2);

}

CAYENNE_OUT(AkumTempV3)
{
    // This command writes the temperature in Celsius to the Virtual out.
    Cayenne.celsiusWrite(AkumTempV3, akum_temp3);
    Serial.print("Temp3 Out: ");
    Serial.println(akum_temp3);
}
Make those changes and let’s see what you get. I added a debug statement to throw the temps out to the serial monitor every time an update is sent to Cayenne.
Cheers,
Craig
Follow the new code:
//#define CAYENNE_PRINT Serial  // Kad sutaupyti atminties galima uzkomentuoti.

#include <OneWire.h>
#include <DallasTemperature.h>
#include <CayenneSerial.h>


// Aprasyti virtualus PIN'ai rysiui su Cayenne
//-------------------------------------------------------------------------------------------------------------------------//
#define AkumTempV1 V0
#define AkumTempV2 V1
#define AkumTempV3 V2
//-------------------------------------------------------------------------------------------------------------------------//

// Aprasyti temperaturu davikliu PIN'ai
//-------------------------------------------------------------------------------------------------------------------------//
#define TempDavikliai 3 //DS18B20 davikliu PIN

float akum_temp1;
float akum_temp2;
float akum_temp3;
//-------------------------------------------------------------------------------------------------------------------------//


// DS18B20 davikliams ant OneWire
OneWire oneWire(TempDavikliai);
DallasTemperature sensors(&oneWire);


//DS18B20 davikliu adresu aprasymas
//-------------------------------------------------------------------------------------------------------------------------//
DeviceAddress AkumT1 = { 0x28, 0xEE, 0x02, 0x88, 0x16, 0x16, 0x01, 0xE1 };
DeviceAddress AkumT2 = { 0x28, 0xEE, 0x1E, 0x3B, 0x15, 0x16, 0x01, 0x41 };
DeviceAddress AkumT3 = { 0x28, 0xEE, 0xA1, 0x45, 0x17, 0x16, 0x02, 0x71 };
//-------------------------------------------------------------------------------------------------------------------------//


// Cayenne authentication token. This should be obtained from the Cayenne Dashboard.
char token[] = "27hmhv6grc";


// Setup pradzia
//---------------------------------------------------------------------------------------------------------------------------------------------------------------------//
void setup()
{

  Serial.begin(9600);

  Cayenne.begin(token);

  sensors.begin(); // Uzkuriam DS18B20 daviklius

  sensors.setResolution(AkumT1, 11); //Rezoliucija: 9 - 0.5°C; Rezoliucija: 10 - 0.25°C; Rezoliucija: 11 - 0.125°C;
  sensors.setResolution(AkumT2, 11);
  sensors.setResolution(AkumT3, 11);

}


// Loop pradzia
//---------------------------------------------------------------------------------------------------------------------------------------------------------------------//
void loop()
{
  Cayenne.run();
  sensors.requestTemperatures();

}

// This function is called when the Cayenne widget requests data for the Virtual Pin.
CAYENNE_OUT(AkumTempV1)
{
    // This command writes the temperature in Celsius to the Virtual out.
    Cayenne.celsiusWrite(AkumTempV1, akum_temp1);
    Serial.print("Temp1 Out: ");
    Serial.println(akum_temp1);
}

CAYENNE_OUT(AkumTempV2)
{
    // This command writes the temperature in Celsius to the Virtual out.
    Cayenne.celsiusWrite(AkumTempV2, akum_temp2);
    Serial.print("Temp2 Out: ");
    Serial.println(akum_temp2);

}

CAYENNE_OUT(AkumTempV3)
{
    // This command writes the temperature in Celsius to the Virtual out.
    Cayenne.celsiusWrite(AkumTempV3, akum_temp3);
    Serial.print("Temp3 Out: ");
    Serial.println(akum_temp3);
}
And the results
I’m using the DS18B20 Sensor in Virtual Pin as I mention in code: V0, V1 and V2, but nothing is showed.
Can you share your serial monitor output so we can see if the temps are making it to those print statements that @kreggly added?
Your loop should look like this:
void loop()
{
    Cayenne.run();

    sensors.requestTemperatures();

    akum_temp1 = (sensors.getTempC(AkumT1));
    akum_temp2 = (sensors.getTempC(AkumT2));
    akum_temp3 = (sensors.getTempC(AkumT3));
}
When I use this code in loop:
void loop()
{

  Cayenne.run();

  sensors.requestTemperatures();

  akum_temp1 = (sensors.getTempC(AkumT1));
  akum_temp2 = (sensors.getTempC(AkumT2));
  akum_temp3 = (sensors.getTempC(AkumT3));

  Serial.print("Temp1 Out: ");
  Serial.println(akum_temp1);
  Serial.print("Temp2 Out: ");
  Serial.println(akum_temp2);
  Serial.print("Temp3 Out: ");
  Serial.println(akum_temp1);
  delay(10000);

}
This is the result:
But when I use just the other code, this is my monitor
#include <OneWire.h>
#include <DallasTemperature.h>
#include <CayenneSerial.h>

#define CAYENNE_PRINT Serial  // Kad sutaupyti atminties galima uzkomentuoti.

// Aprasyti virtualus PIN'ai rysiui su Cayenne
//-------------------------------------------------------------------------------------------------------------------------//
#define AkumTempV1 V0
#define AkumTempV2 V1
#define AkumTempV3 V2
//-------------------------------------------------------------------------------------------------------------------------//


// Aprasyti temperaturu davikliu PIN'ai
//-------------------------------------------------------------------------------------------------------------------------//
#define TempDavikliai 2 //DS18B20 davikliu PIN
//-------------------------------------------------------------------------------------------------------------------------//


// Aprasyti temperaturu kintamieji
//-------------------------------------------------------------------------------------------------------------------------//
float akum_temp1;
float akum_temp2;
float akum_temp3;
//-------------------------------------------------------------------------------------------------------------------------//


// DS18B20 davikliams ant OneWire
OneWire oneWire(TempDavikliai);
DallasTemperature sensors(&oneWire);


//DS18B20 davikliu adresu aprasymas
//-------------------------------------------------------------------------------------------------------------------------//
DeviceAddress AkumT1 = { 0x28, 0xEE, 0x02, 0x88, 0x16, 0x16, 0x01, 0xE1 }; // Endereço do Sensor da panela 01
DeviceAddress AkumT2 = { 0x28, 0xEE, 0x1E, 0x3B, 0x15, 0x16, 0x01, 0x41 }; // Endereço do Sensor da panela 02
DeviceAddress AkumT3 = { 0x28, 0xEE, 0xA1, 0x45, 0x17, 0x16, 0x02, 0x71 }; // Endereço do Sensor da panela 03
//-------------------------------------------------------------------------------------------------------------------------//


// Cayenne authentication token. This should be obtained from the Cayenne Dashboard.
char token[] = "27hmhv6grc";


// Setup pradzia
//---------------------------------------------------------------------------------------------------------------------------------------------------------------------//
void setup()
{


  Serial.begin(9600);

  Cayenne.begin(token);

  sensors.begin(); // Uzkuriam DS18B20 daviklius

  sensors.setResolution(AkumT1, 10); //Rezoliucija: 9 - 0.5°C; Rezoliucija: 10 - 0.25°C; Rezoliucija: 11 - 0.125°C;
  sensors.setResolution(AkumT2, 10);
  sensors.setResolution(AkumT3, 10);


}
// Setup pabaiga
//---------------------------------------------------------------------------------------------------------------------------------------------------------------------//


// Loop pradzia
//---------------------------------------------------------------------------------------------------------------------------------------------------------------------//
void loop()
{

  Cayenne.run();

  sensors.requestTemperatures();

  akum_temp1 = (sensors.getTempC(AkumT1));
  akum_temp2 = (sensors.getTempC(AkumT2));
  akum_temp3 = (sensors.getTempC(AkumT3));

  /*---------------------------------------------------------------------------------------------------------------------------------------
  Serial.print("Temp1 Out: ")
  Serial.println(akum_temp1);
  Serial.print("Temp2 Out: ");
  Serial.println(akum_temp2);
  Serial.print("Temp3 Out: ");
  Serial.println(akum_temp1);
  delay(10000);
  ---------------------------------------------------------------------------------------------------------------------------------------*/

}
// Pabaiga void loop
//---------------------------------------------------------------------------------------------------------------------------------------------------------------------//


//
// This function is called when the Cayenne widget requests data for the Virtual Pin.
CAYENNE_OUT(AkumTempV1)
{
  // Send the command to get temperatures.
  //sensors.requestTemperatures();
  // This command writes the temperature in Celsius to the Virtual Pin.
  //Cayenne.celsiusWrite(AkumTempV1, sensors.getTempC(AkumT1));
  Cayenne.celsiusWrite(AkumTempV1, akum_temp1);
  Serial.print("Temp1 Out: ");
  Serial.println(akum_temp1);
}

CAYENNE_OUT(AkumTempV2)
{
  // Send the command to get temperatures.
  //sensors.requestTemperatures();
  // This command writes the temperature in Celsius to the Virtual Pin.
  //Cayenne.celsiusWrite(AkumTempV2, sensors.getTempC(AkumT2));
  Cayenne.celsiusWrite(AkumTempV2, akum_temp2);
  Serial.print("Temp2 Out: ");
  Serial.println(akum_temp2);
}

CAYENNE_OUT(AkumTempV3)
{
  // Send the command to get temperatures.
  //sensors.requestTemperatures();
  // This command writes the temperature in Celsius to the Virtual Pin.
  Cayenne.celsiusWrite(AkumTempV3, akum_temp3);
  Serial.print("Temp3 Out: ");
  Serial.println(akum_temp3);
}
This text is my token. I’m using the Usb Conect, using my computer as a bridge to connect. I don’t know if for this reason My code is not running correctly.
This text is my token. I’m using the Usb Conect, using my computer as a bridge to connect. I don’t know if for this reason My code is not running correctly.
Yes, it says that it will interfere right in the example serial sketch:
/*
Cayenne Serial USB Example

This sketch connects to the Cayenne server using an Arduino Serial USB connection
and runs the main communication loop.

The Cayenne Library is required to run this sketch. If you have not already done so you can install it from the Arduino IDE Library Manager.

For Cayenne Dashboard widgets using digital or analog pins this sketch will automatically
send data on those pins to the Cayenne server. If the widgets use Virtual Pins, data
should be sent to those pins using virtualWrites. Examples for sending and receiving
Virtual Pin data are under the Basics folder.

This requires the use of the Serial USB connection so you cannot use the Serial device for
printing messages. If you need to print you can use SoftwareSerial and connect another device
to read messages via the SoftwareSerial pins.

In order for this to work you must run the connection script on the machine the Arduino is connected to.
The scripts are located under the extras\scripts folder in the main library folder. This redirects the traffic
from the Arduino to the Cayenne server.

Steps:
1. Set the token variable to match the Arduino token from the Dashboard.
2. Compile and upload this sketch.
3. Launch the connection script as described below for Windows or Linux/OSX.

Windows:
	1. Open the Windows command line (cmd.exe)
	2. Navigate to the scripts folder by typing "cd [path]", e.g.  "cd C:\Users\[YourUserName]\Documents\Arduino\libraries\Cayenne\extras\scripts"
	3. Run the script by typing "cayenne-ser.bat -c COM4" (where COM4 is port with your Arduino) and hitting Enter

Linux and OSX:
    ./cayenne-ser.sh (may need to run with sudo)

You can specify port, baud rate, and server endpoint like this:
    ./cayenne-ser.sh -c <serial port> -b <baud rate> -s <server address> -p <server port>

    For instance :
      ./cayenne-ser.sh -c /dev/ttyACM0 -b 9600 -s arduino.mydevices.com -p 8442

    Run cayenne-ser.sh -h for more information

    Be sure to select the right serial port (there may be multiple).

ATTENTION!
	Do not use Serial to display any output in this sketch. It will interfere with the Serial
	USB connection. When uploading sketches the Arduino IDE may complain with "programmer is
	not responding" or "Access is denied." You will need to terminate the connection script
	before uploading new sketches since it blocks access to the Serial port. Also make sure
	the Serial Monitor is disabled in the IDE since that can prevent the Arduino from
	connecting to the Windows/Linux/OSX machine. If you use Visual Micro for Visual Studio make
	sure Automatic Debugging is disabled. Otherwise the Serial Monitor can interfere with the
	Serial connection.
*/
What we do know though from the serial output is that your devices are being read and getting into the global variables, so after removing the serial print statements, the CAYENNE_PRINT definition, and Serial.begin() from your setup, these measurement should be getting to your dashboard, if you also running the cayenne-ser.bat redirection script as instructed in the above copied instructions.
Cheers,
Craig
I Commented the line Serial Print definition and Serial.Begin, but it’s not working yet.
I’m using the “Cayenne-ser.bat” and I can change the led in Pin13 normally, but i cannot read the sensors temperature.

follow the code again:
#include <OneWire.h>
#include <DallasTemperature.h>
#include <CayenneSerial.h>

//#define CAYENNE_PRINT Serial  // Kad sutaupyti atminties galima uzkomentuoti.

// Define os pinos virtuais
//-------------------------------------------------------------------------------------------------------------------------//
#define AkumTempV1 V0
#define AkumTempV2 V1
#define AkumTempV3 V2
//-------------------------------------------------------------------------------------------------------------------------//


// Define o pino na placa Arduino
//-------------------------------------------------------------------------------------------------------------------------//
#define TempDavikliai 2 //DS18B20 davikliu PIN
//-------------------------------------------------------------------------------------------------------------------------//


// Cria as variáveis para registro da temperatura medida
//-------------------------------------------------------------------------------------------------------------------------//
float akum_temp1;
float akum_temp2;
float akum_temp3;
//-------------------------------------------------------------------------------------------------------------------------//


// DS18B20 Define os sensores OneWire e Temperatura
OneWire oneWire(TempDavikliai);
DallasTemperature sensors(&oneWire);


//DS18B20 Define os enderecos dos sensores
//-------------------------------------------------------------------------------------------------------------------------//
DeviceAddress AkumT1 = { 0x28, 0xEE, 0x02, 0x88, 0x16, 0x16, 0x01, 0xE1 }; // Endereço do Sensor da panela 01
DeviceAddress AkumT2 = { 0x28, 0xEE, 0x1E, 0x3B, 0x15, 0x16, 0x01, 0x41 }; // Endereço do Sensor da panela 02
DeviceAddress AkumT3 = { 0x28, 0xEE, 0xA1, 0x45, 0x17, 0x16, 0x02, 0x71 }; // Endereço do Sensor da panela 03
//-------------------------------------------------------------------------------------------------------------------------//


// Token de Autenticação do Sistema Cayenne
char token[] = "27hmhv6grc";


// Bloco de Setup
//---------------------------------------------------------------------------------------------------------------------------------------------------------------------//
void setup()
{


  //Serial.begin(9600);

  Cayenne.begin(token);

  sensors.begin(); // DS18B20 Inicializa o sensor

  //DS18B20 Define a resolução dos sensores
  //-------------------------------------------------------------------------------------------------------------------------//
  sensors.setResolution(AkumT1, 10); //Rezoliucija: 9 - 0.5°C; Rezoliucija: 10 - 0.25°C; Rezoliucija: 11 - 0.125°C;
  sensors.setResolution(AkumT2, 10);
  sensors.setResolution(AkumT3, 10);
  //-------------------------------------------------------------------------------------------------------------------------//


}
// Final do bloco Setup
//---------------------------------------------------------------------------------------------------------------------------------------------------------------------//


// Inicio do Bloco Loop
//---------------------------------------------------------------------------------------------------------------------------------------------------------------------//
void loop()
{
  //Inicializa o módulo Cayenne
  Cayenne.run();

  //Solicita a leitura de temperatura pelos sensores
  sensors.requestTemperatures();
  akum_temp1 = (sensors.getTempC(AkumT1));
  akum_temp2 = (sensors.getTempC(AkumT2));
  akum_temp3 = (sensors.getTempC(AkumT3));


}
// Fim do bloco loop
//---------------------------------------------------------------------------------------------------------------------------------------------------------------------//


//
// This function is called when the Cayenne widget requests data for the Virtual Pin.
CAYENNE_OUT(AkumTempV1)
{
  // This command writes the temperature in Celsius to the Virtual Pin.
  Cayenne.celsiusWrite(AkumTempV1, akum_temp1);
  //Serial.print("Temp1 Out: ");
  //Serial.println(akum_temp1);
}

CAYENNE_OUT(AkumTempV2)
{
  // This command writes the temperature in Celsius to the Virtual Pin.
  Cayenne.celsiusWrite(AkumTempV2, akum_temp2);
  //Serial.print("Temp2 Out: ");
  //Serial.println(akum_temp2);
}

CAYENNE_OUT(AkumTempV3)
{
  // This command writes the temperature in Celsius to the Virtual Pin.
  Cayenne.celsiusWrite(AkumTempV3, akum_temp3);
    //Serial.print("Temp3 Out: ");
  //Serial.println(akum_temp3);
}
Ok, so delete the temperature widgets you have and create 3 generic analog sensors instead for Channels 0, 1, and 2.
See what that gets you.
Cheers,
Craig
I’ve just use the code in Cayenne Exemple and it’s working.
/*
Cayenne DS18B20 Example

This sketch shows how to send temperature data to a DS18B20 Sensor in the Cayenne Dashboard.

The Cayenne Library is required to run this sketch. If you have not already done so you can install it from the Arduino IDE Library Manager.

Steps:
1. Install the OneWire library (http://www.pjrc.com/teensy/td_libs_OneWire.html) from the Arduino Library Manager.
2. Install the DallasTemperature library (http://milesburton.com/Main_Page?title=Dallas_Temperature_Control_Library#Code.2FLibrary) from the Arduino Library Manager.
3. In the Cayenne Dashboard add a new DS18B20 widget.
4. Set the widget to Value Display.
5. Select Virtual Pins and a virtual pin number.
6. Set VIRTUAL_PIN to the pin number you selected.
7. Attach a DS18B20 to an digital pin on your Arduino.
   Schematic:
   [Ground] -- [DS18B20] -- [4.7k resistor] -- [5V]
                   |______________|
                   |
              Digital Pin
8. Set the tmpPin variable to match the pin used to connect the DS18B20.
9. Set the token variable to match the Arduino token from the Dashboard.
10. Compile and upload this sketch.
11. Once the Arduino connects to the Dashboard it should automatically update the DS18B20 widget with data.
*/

//#define CAYENNE_PRINT Serial  // Comment this out to disable prints and save space
#include <OneWire.h>
#include <DallasTemperature.h>
#include <CayenneSerial.h>

// Virtual Pin of the DS18B20 widget.
#define VIRTUAL_PIN1 V1
#define VIRTUAL_PIN2 V2
#define VIRTUAL_PIN3 V3

// Digital pin the DS18B20 is connected to. Do not use digital pins 0 or 1 since those conflict with the use of Serial.
const int tmpPin = 2;

OneWire oneWire(tmpPin);
DallasTemperature sensors(&oneWire);

// Cayenne authentication token. This should be obtained from the Cayenne Dashboard.
char token[] = "27hmhv6grc";

void setup()
{
	//Serial.begin(9600);
	Cayenne.begin(token);
	sensors.begin();
}

void loop()
{
	Cayenne.run();
}

// This function is called when the Cayenne widget requests data for the Virtual Pin.
CAYENNE_OUT(VIRTUAL_PIN1)
{
	// Send the command to get temperatures.
	sensors.requestTemperatures();
	// This command writes the temperature in Celsius to the Virtual Pin.
	Cayenne.celsiusWrite(VIRTUAL_PIN1, sensors.getTempCByIndex(0));
	// To send the temperature in Fahrenheit use the corresponding code below.
	//Cayenne.fahrenheitWrite(VIRTUAL_PIN, sensors.getTempFByIndex(0));
}

CAYENNE_OUT(VIRTUAL_PIN2)
{
  // Send the command to get temperatures.
  sensors.requestTemperatures();
  // This command writes the temperature in Celsius to the Virtual Pin.
  Cayenne.celsiusWrite(VIRTUAL_PIN2, sensors.getTempCByIndex(1));
  // To send the temperature in Fahrenheit use the corresponding code below.
  //Cayenne.fahrenheitWrite(VIRTUAL_PIN, sensors.getTempFByIndex(0));
}

CAYENNE_OUT(VIRTUAL_PIN3)
{
  // Send the command to get temperatures.
  sensors.requestTemperatures();
  // This command writes the temperature in Celsius to the Virtual Pin.
  Cayenne.celsiusWrite(VIRTUAL_PIN3, sensors.getTempCByIndex(2));
  // To send the temperature in Fahrenheit use the corresponding code below.
  //Cayenne.fahrenheitWrite(VIRTUAL_PIN, sensors.getTempFByIndex(0));
}
I’ll just rename the variables and comment the code
Thanks everyone
Just for information. It was necessary exclude from loop:
sensors.requestTemperatures();

akum_temp1 = (sensors.getTempC(AkumT1));
akum_temp2 = (sensors.getTempC(AkumT2));
akum_temp3 = (sensors.getTempC(AkumT3));
My finished void loop is:
void loop()
{
	Cayenne.run();

}
Regards
It should work this way too. You just might need a delay in the main loop so you aren’t bashing the OneWire bus so much.
The way you have it now, is every time there is a call for Cayenne data, you are reading all the sensors then just throwing out the one data element you are after. This might work now, but might bite later.
Something to be aware of. Glad it is working for you.
Cheers,
Craig
Thank you.
I’m using a SimpleTimer Library to get temperature. So I can eliminate the Call in every CAYENNEOUT function
#include <SimpleTimer.h> // Importa a biblioteca SimpleTimer para utilizar o timer

// Cria um objeto do tipo SimpleTimer
SimpleTimer timer;

//Cria a função para ser utilizada pelo timer
//-------------------------------------------------------------------------------------------------------------------------//
void repeatMe()
{
  //Captura a temperatura do Sensor
  sensors.requestTemperatures();
}
//-------------------------------------------------------------------------------------------------------------------------//
//Finaliza a função exemplo para ser utilizada pelo timer


//Inicio do bloco Setup
//-------------------------------------------------------------------------------------------------------------------------//
void setup()
{
	//Serial.begin(9600);

  //Inicializa a conexao com o Cayenne
	Cayenne.begin(token);

  // Inicializa os sensores de medicao
	sensors.begin();


  //Define a resolução dos sensores por meio do endereco individual - Sensor de temperatura DS18B20
  //-------------------------------------------------------------------------------------------------------------------------//
  sensors.setResolution(V1_ENDERECO, 11); //Rezoliucija: 9 - 0.5°C; Rezoliucija: 10 - 0.25°C; Rezoliucija: 11 - 0.125°C;
  sensors.setResolution(V2_ENDERECO, 11);
  sensors.setResolution(V3_ENDERECO, 11);
  //-------------------------------------------------------------------------------------------------------------------------//


  //Define a função do Timer
  timer.setInterval(5000, repeatMe);

}
//-------------------------------------------------------------------------------------------------------------------------//
//Fim do Bloco Setup


/Inicio do bloco Loop
//-------------------------------------------------------------------------------------------------------------------------//
void loop()
{
	//Executa o módulo Cayenne
  Cayenne.run();


  //Executa o módulo do timer
  timer.run();


}
//-------------------------------------------------------------------------------------------------------------------------//
//Fim do bloco Loop


// Funcao (Output) cahamada quando o Cayenne requisita informacoes sobre o Pino Virtual 01 - Sensor de temperatura DS18B20
//-------------------------------------------------------------------------------------------------------------------------//
CAYENNE_OUT(VIRTUAL_PIN1)
{
	// Send the command to get temperatures.
  //sensors.requestTemperatures();
	// This command writes the temperature in Celsius to the Virtual Pin.
	Cayenne.celsiusWrite(VIRTUAL_PIN1, sensors.getTempCByIndex(0));
	// To send the temperature in Fahrenheit use the corresponding code below.
	//Cayenne.fahrenheitWrite(VIRTUAL_PIN, sensors.getTempFByIndex(0));
}
//-------------------------------------------------------------------------------------------------------------------------//
// Fim da função Output do Pino Virtual 01


// Funcao (Output) cahamada quando o Cayenne requisita informacoes sobre o Pino Virtual 03 - Sensor de temperatura DS18B20
//-------------------------------------------------------------------------------------------------------------------------//
CAYENNE_OUT(VIRTUAL_PIN2)
{
  // Send the command to get temperatures.
  //sensors.requestTemperatures();
  // This command writes the temperature in Celsius to the Virtual Pin.
  Cayenne.celsiusWrite(VIRTUAL_PIN2, sensors.getTempCByIndex(1));
  // To send the temperature in Fahrenheit use the corresponding code below.
  //Cayenne.fahrenheitWrite(VIRTUAL_PIN, sensors.getTempFByIndex(0));
}
//-------------------------------------------------------------------------------------------------------------------------//
// Fim da função Output do Pino Virtual 02

// Funcao (Output) cahamada quando o Cayenne requisita informacoes sobre o Pino Virtual 03 - Sensor de temperatura DS18B20
//-------------------------------------------------------------------------------------------------------------------------//
CAYENNE_OUT(VIRTUAL_PIN3)
{
  // Send the command to get temperatures.
  //sensors.requestTemperatures();
  // This command writes the temperature in Celsius to the Virtual Pin.
  Cayenne.celsiusWrite(VIRTUAL_PIN3, sensors.getTempCByIndex(2));
  // To send the temperature in Fahrenheit use the corresponding code below.
  //Cayenne.fahrenheitWrite(VIRTUAL_PIN, sensors.getTempFByIndex(0));
}
//-------------------------------------------------------------------------------------------------------------------------//
// Fim da função Output do Pino Virtual 03